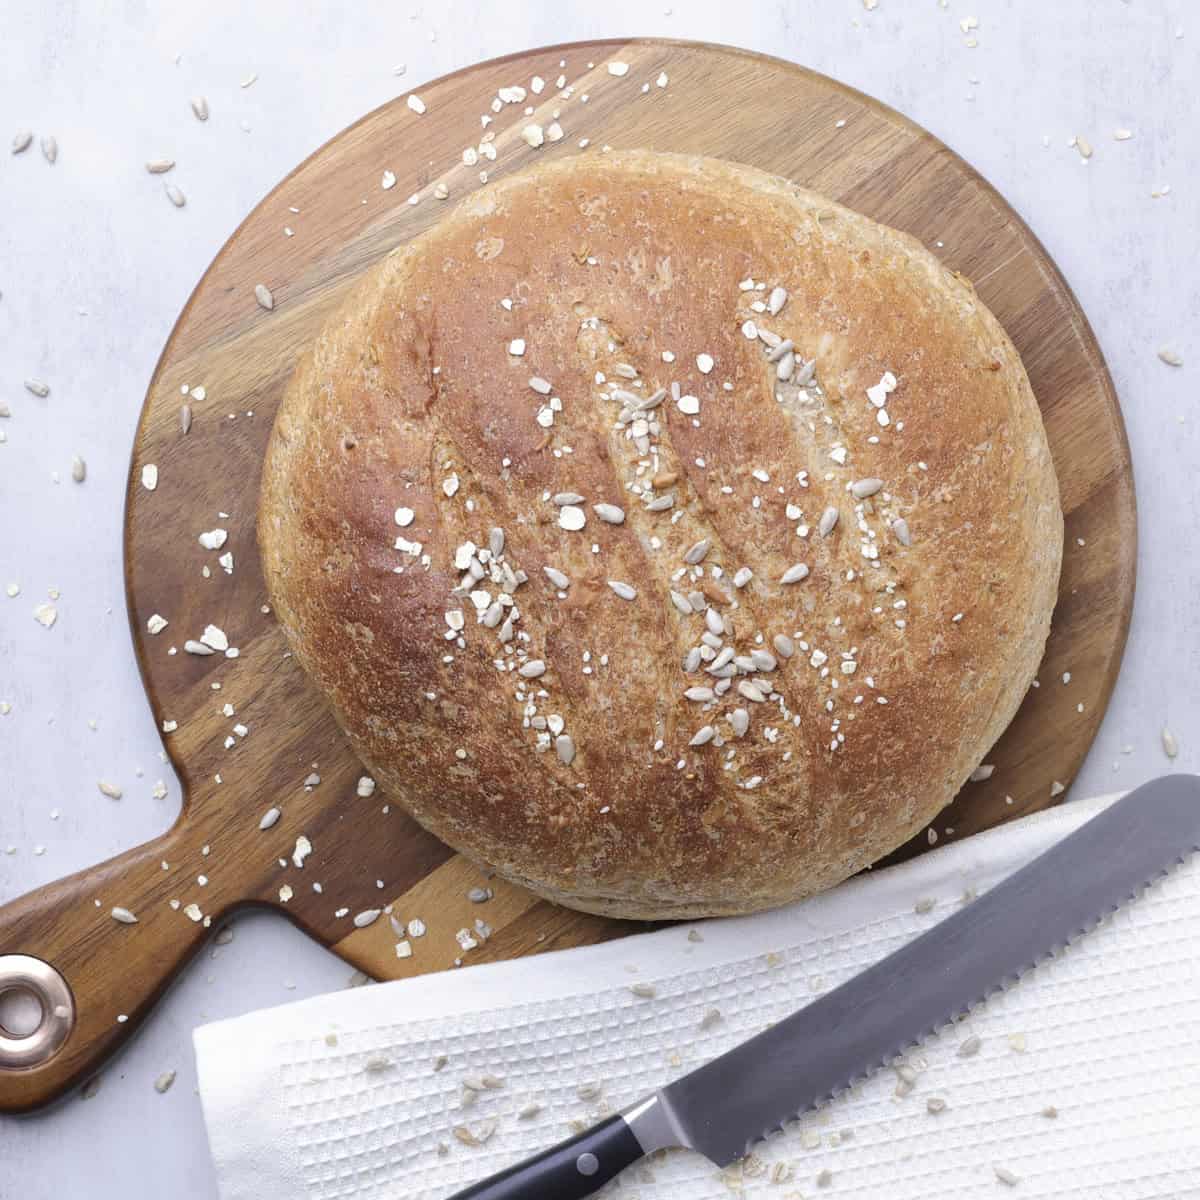
Soft, tender, and packed with the nutty richness of flax-meal, sunflower, and sesame seeds, this Seeded Bread is everything a sandwich loaf should be. What sets it apart? It stays remarkably soft - just like the day it was baked - even days later. Wholesome, flavorful, and freezer-friendly, it's the kind of loaf you'll reach for again and again.

Why I Love This
- It Stays Soft: This is my favorite thing about this loaf. After testing recipe after recipe, I finally created my own - and I couldn't be more proud of it. It's everything you want in a whole grain bread: soft, tender, and full of flavor. Best of all, it stays that way. You don't have to eat it all the day it's baked to enjoy a fresh, delicious slice.
- Hearty: You don't have to feel bad feeding this one to your kids - it's full of amazing grains and seeds that are wholesome and nutrient dense and will leave them feeling full and satisfied longer.
- Approachable: Making bread can feel overwhelming. While this recipe does require some time and a few bowls, it's not complicated and in the end, you dump it all in and turn on the mixer. No kneading required.
- Sandwich or Artisan Style - This dough can easily be baked as an artisan loaf, creating a beautifully crisp crust and more refined, bakery-worthy finish. See the instructions below.
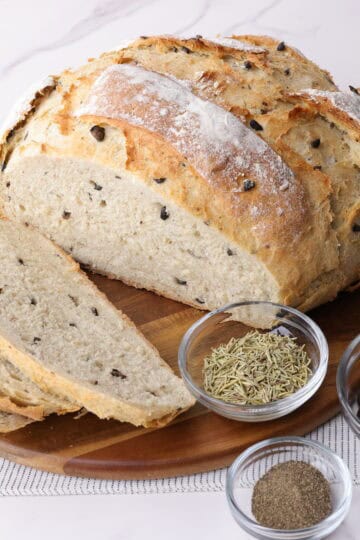
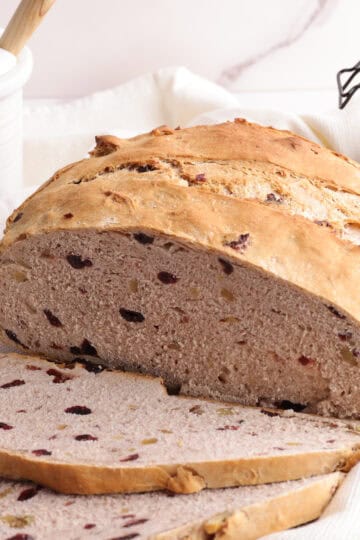
Looking for another delicious and mouthwatering bread recipe? Try my simple Rosemary Garlic artisan loaf or for a festive touch try my Cranberry Walnut loaf.
Jump to:
Ingredients
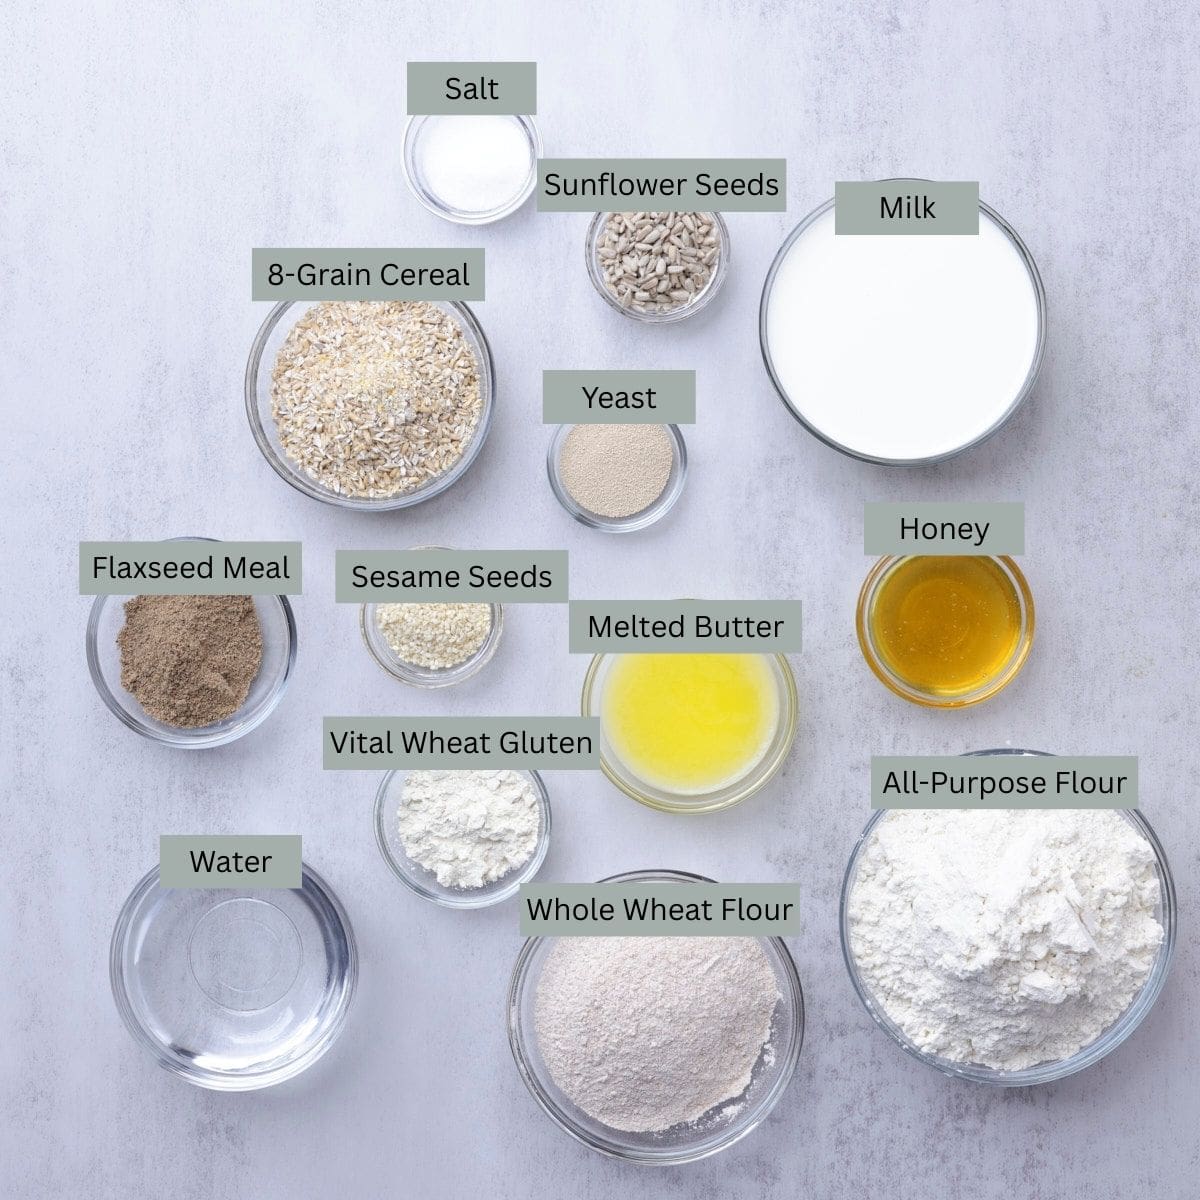
- Milk - this is the secret ingredient that keeps this bread soft. After trying several recipes I realized this was the ingredient I needed to keep my bread soft for longer than the day I baked it.
- 7 (or 8) Grain Cereal - you can use any number of grain - 7, 8, 10, 12 grain cereal - they all work and are amazing. I like to use Bob's Red Mill variety.
- Unsalted butter - this adds flavor and tenderness to the bread.
- Water - a little lukewarm water is used to help activate the yeast.
- Honey - this is mixed in with the water to feed the yeast to help it activate nicely. It also adds flavor to the loaf.
- Yeast - I use traditional yeast as it gives a lovely rise. Quick rise yeast could be used as well - just skip soaking it in the water and honey mixture.
- All purpose flour -I do a mixture of white and whole wheat flour as it keeps the loaf light and soft in texture.
- Whole wheat flour - this adds amazing depth, flavor and nutrients to the bread.
- Vital wheat gluten flour - adding extra gluten is the second secret ingredient to a lasting soft loaf. You don't have to use as much as I call for, but that will slightly change the texture of the bread.
- Flaxseed meal - gives nutrients and depth of flavor.
- Sunflower seeds - bring a wonderful crunch to the loaf without being overpowering.
- Sesame seeds - another layer of nutrients, flavor and texture.
- Salt - don't forget the salt! I've done this so many times and let me tell you - you need it more than you thought! It helps with the rise and is the key player in bringing the flavors of this seeded bread recipe together.
See recipe card for quantities.
Instructions
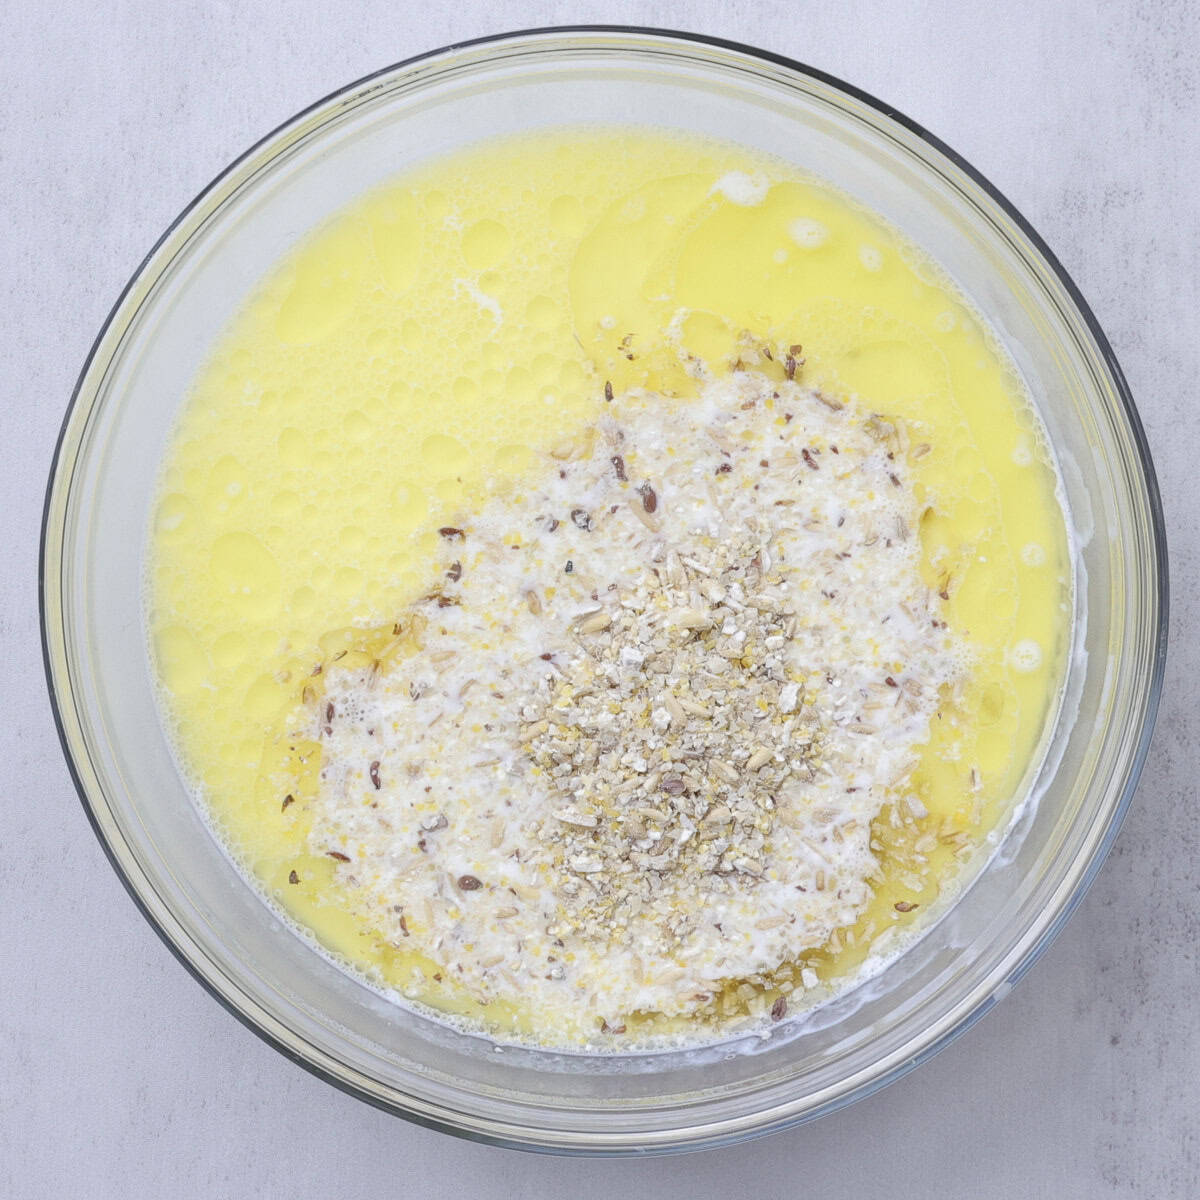
Step 1: Warm milk to slightly above lukewarm and add the melted butter. Pour in the 7 grain cereal, stir to combine and allow to soak for 10 minutes.

Step 2: Warm the water until lukewarm, stir in the honey to dissolve, then add the yeast and stir. Let sit in a warm place until bubbly and active, about 10 minutes.
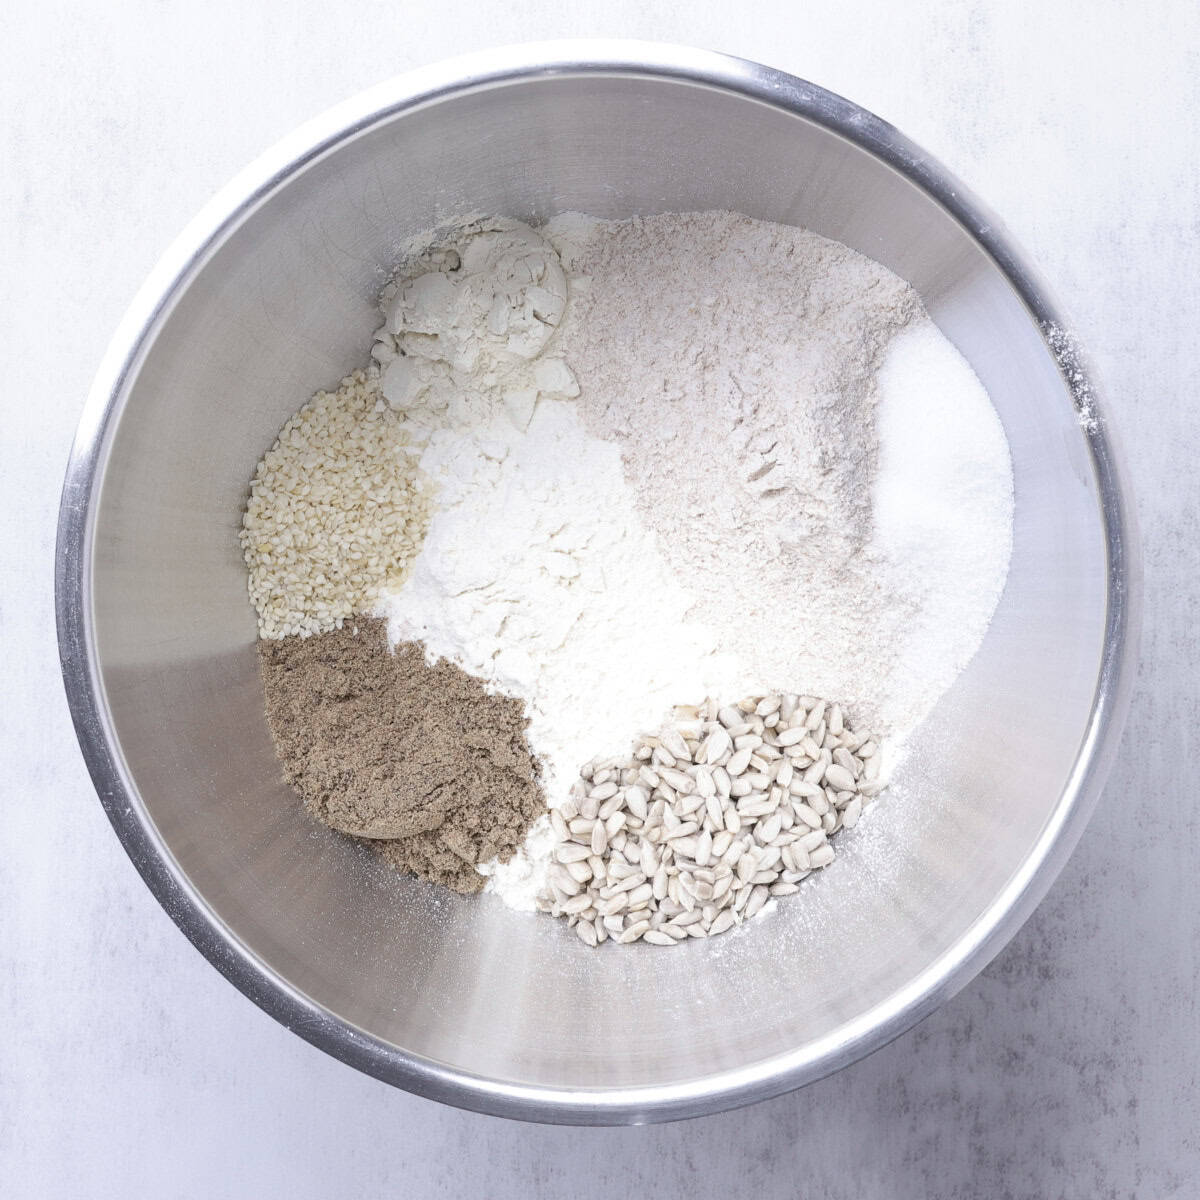
Step 3: In your stand mixer combine the remaining ingredients. Then pour in the milk and cereal mixture as well as the active yeast mixture.
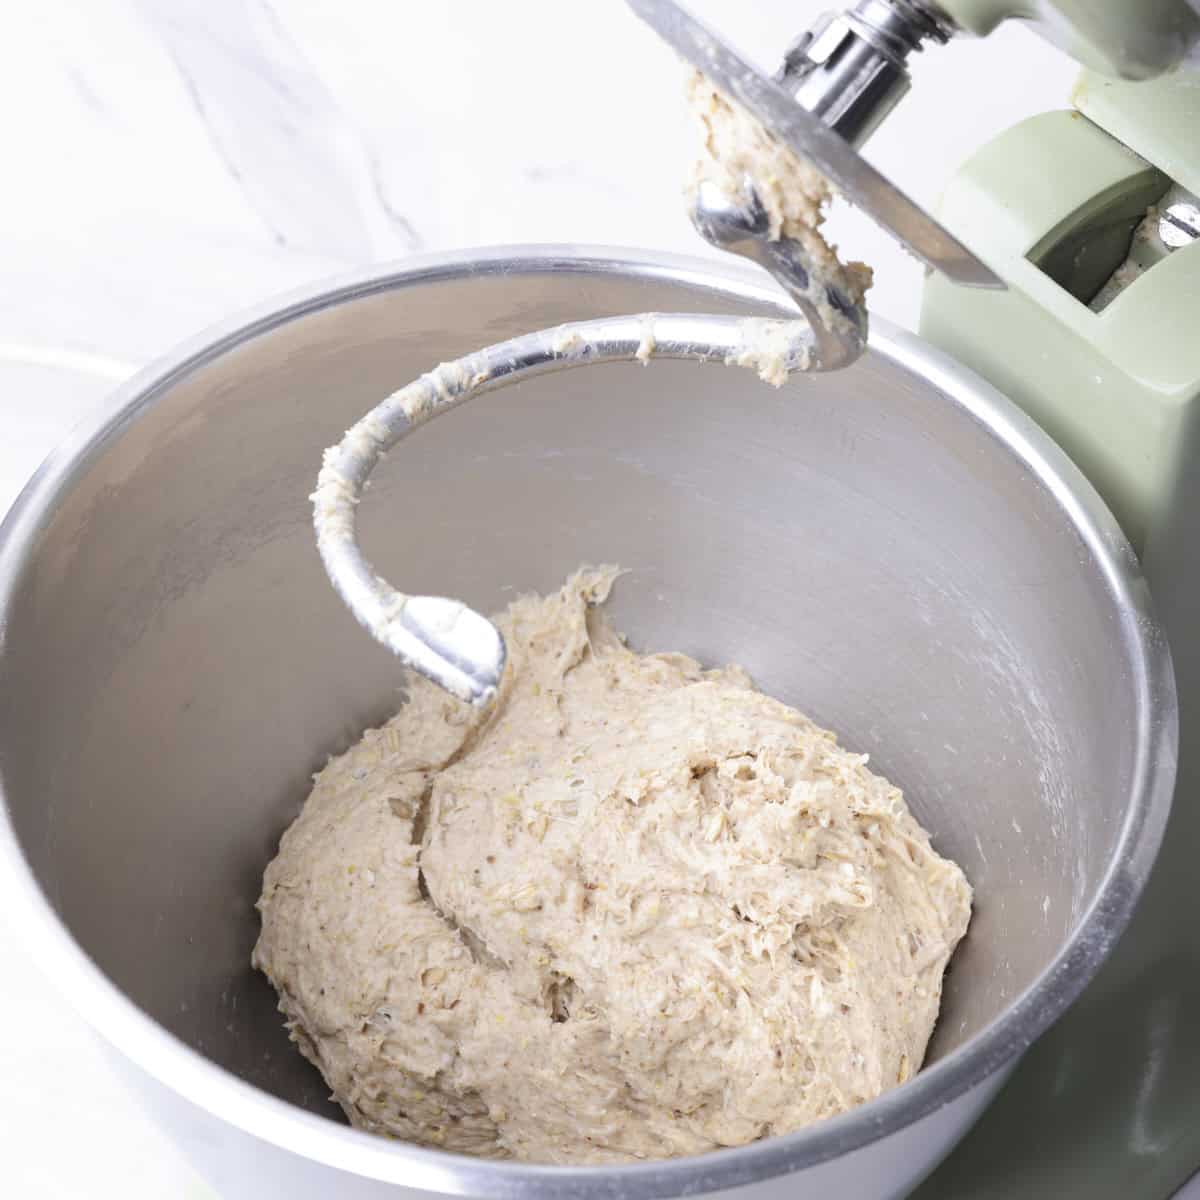
Step 4: Using a dough hook, turn your mixer on low allowing the ingredients to combine, stopping as needed to scrape down the sides and increasing the speed to medium when ready. Mix for 10 minutes.
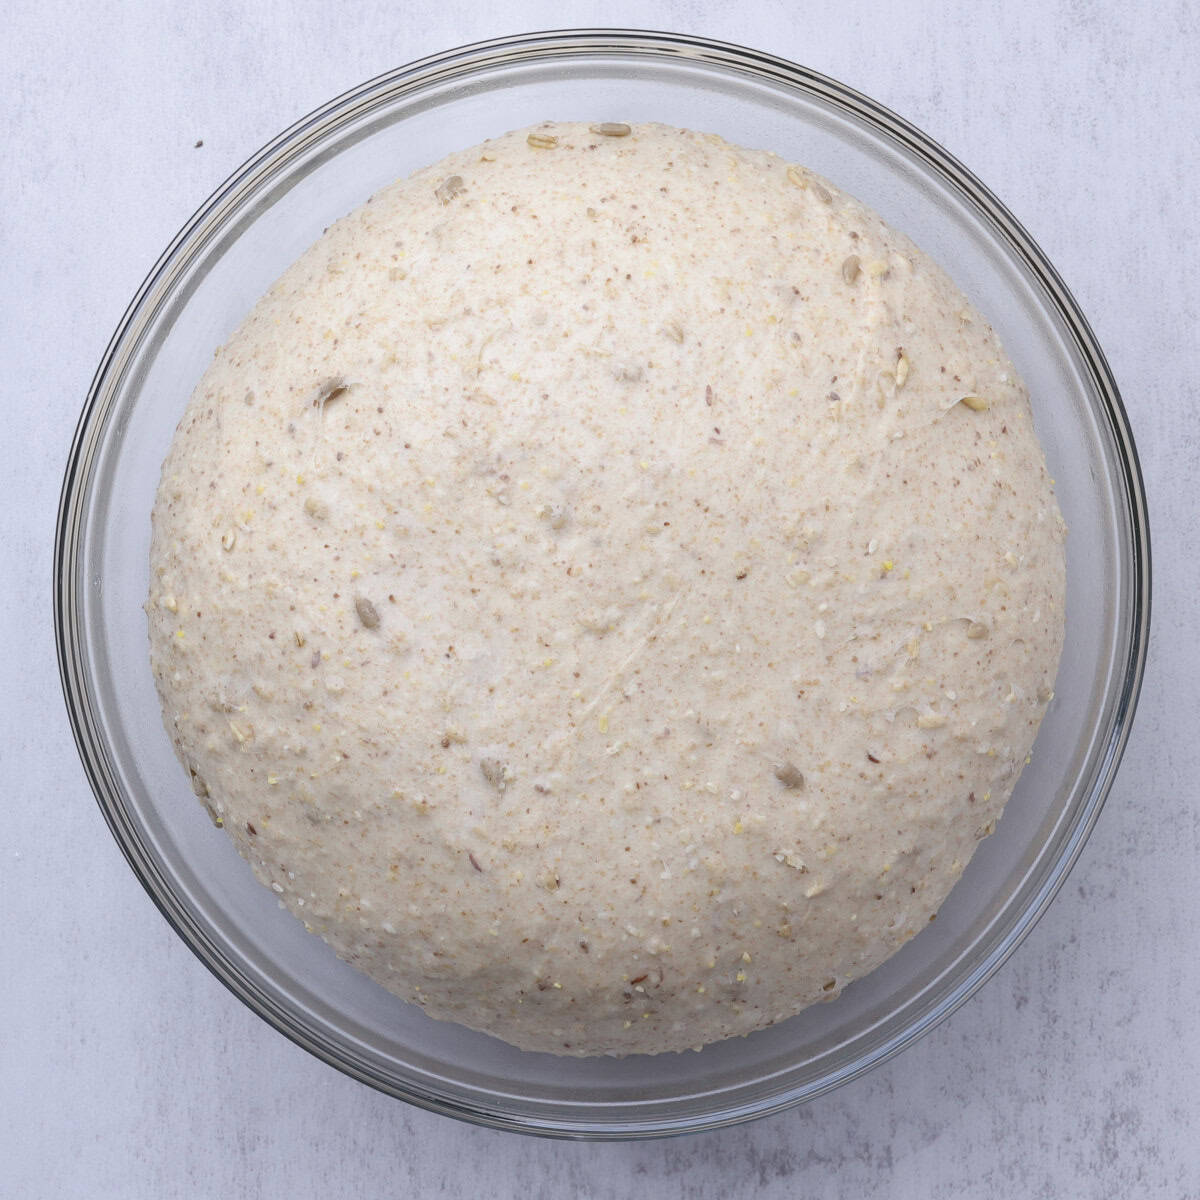
Step 5: The dough should be dense and only slightly sticky. Add more flour, 1 tablespoon at a time if needed. Remove from the mixer onto a clean work surface. Feel free to knead it a few times to form it into a tight ball. Place in a lightly oiled bowl covered with a lid or plastic wrap. Allow to rise in a warm place until doubled in size, about 2 hours.
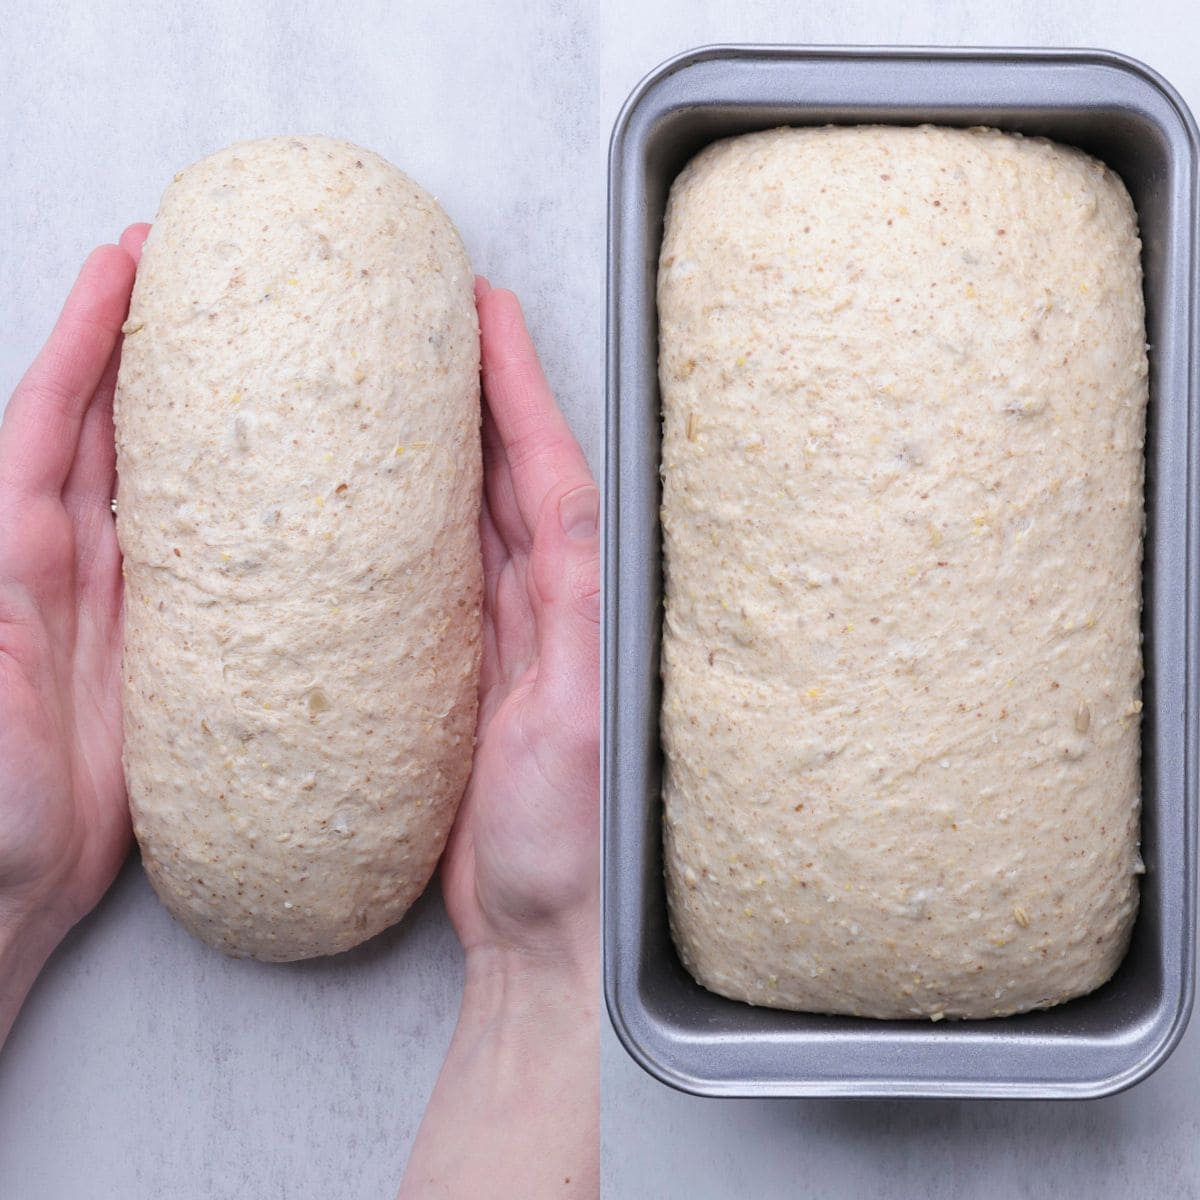
Step 6a: For a Sandwich Loaf: Remove the dough from the bowl onto a clean surface. Pulling the dough towards you along the work surface, make a tight log, tucking in the ends as needed. Place in an greased loaf pan and cover with plastic wrap. Put the pan in a warm place and allow the loaf to rise until slightly above the rim of the pan.
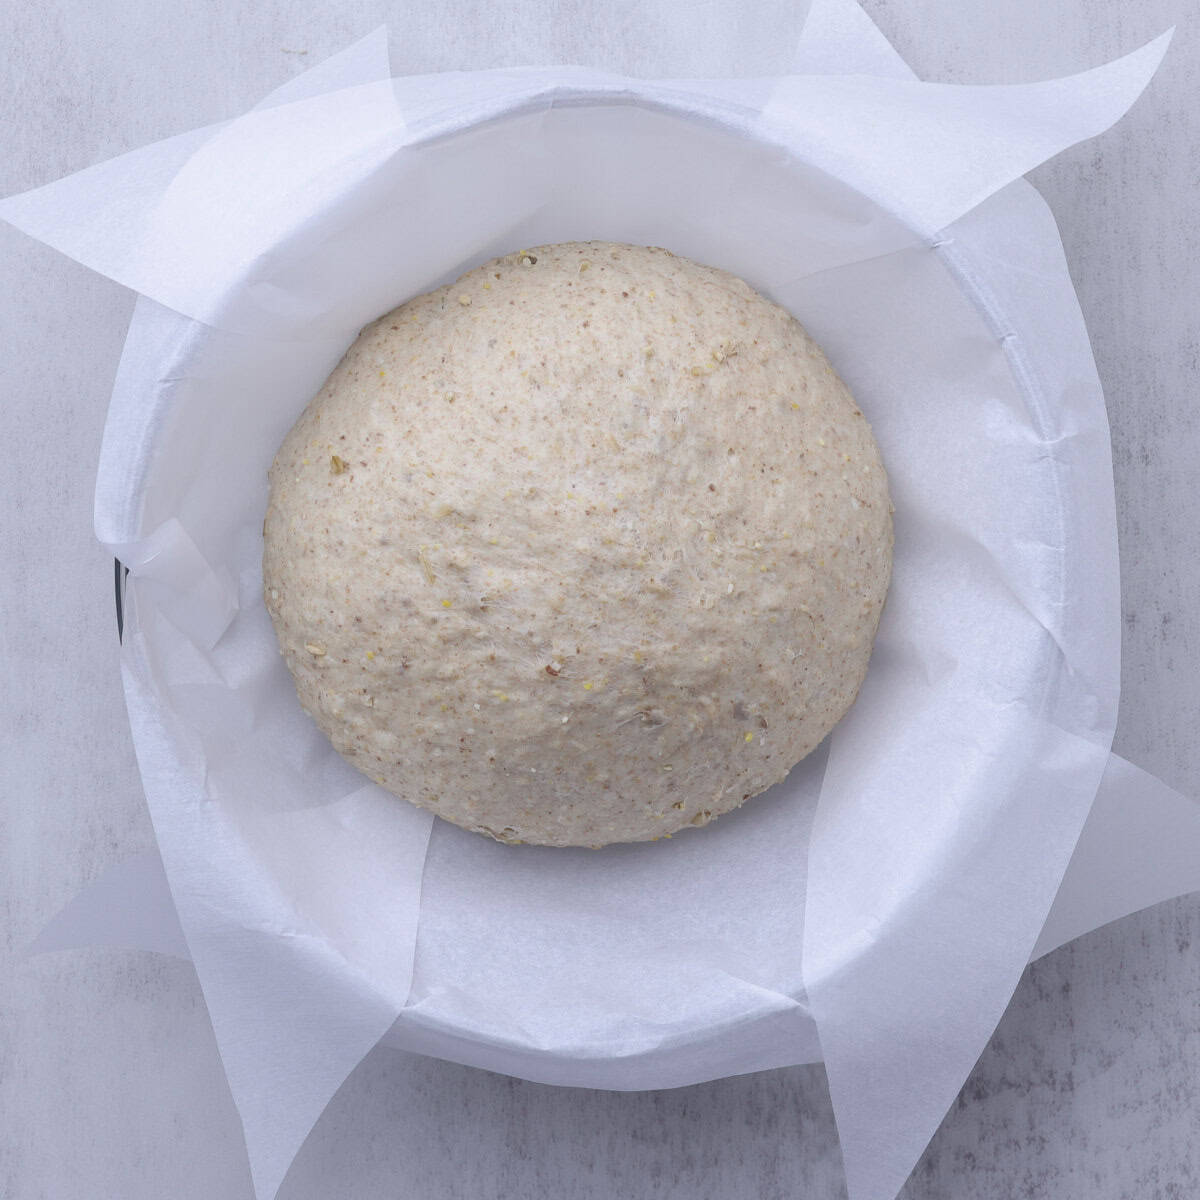
Step 6b: For an Artisan Loaf: Remove the dough from the bowl onto a clean surface. Pulling the dough towards you along the work surface, make a tight ball, rotating the ball as needed. Place in medium sized bowl lined with parchment paper. Put in a warm place and allow the loaf to rise until doubled again.
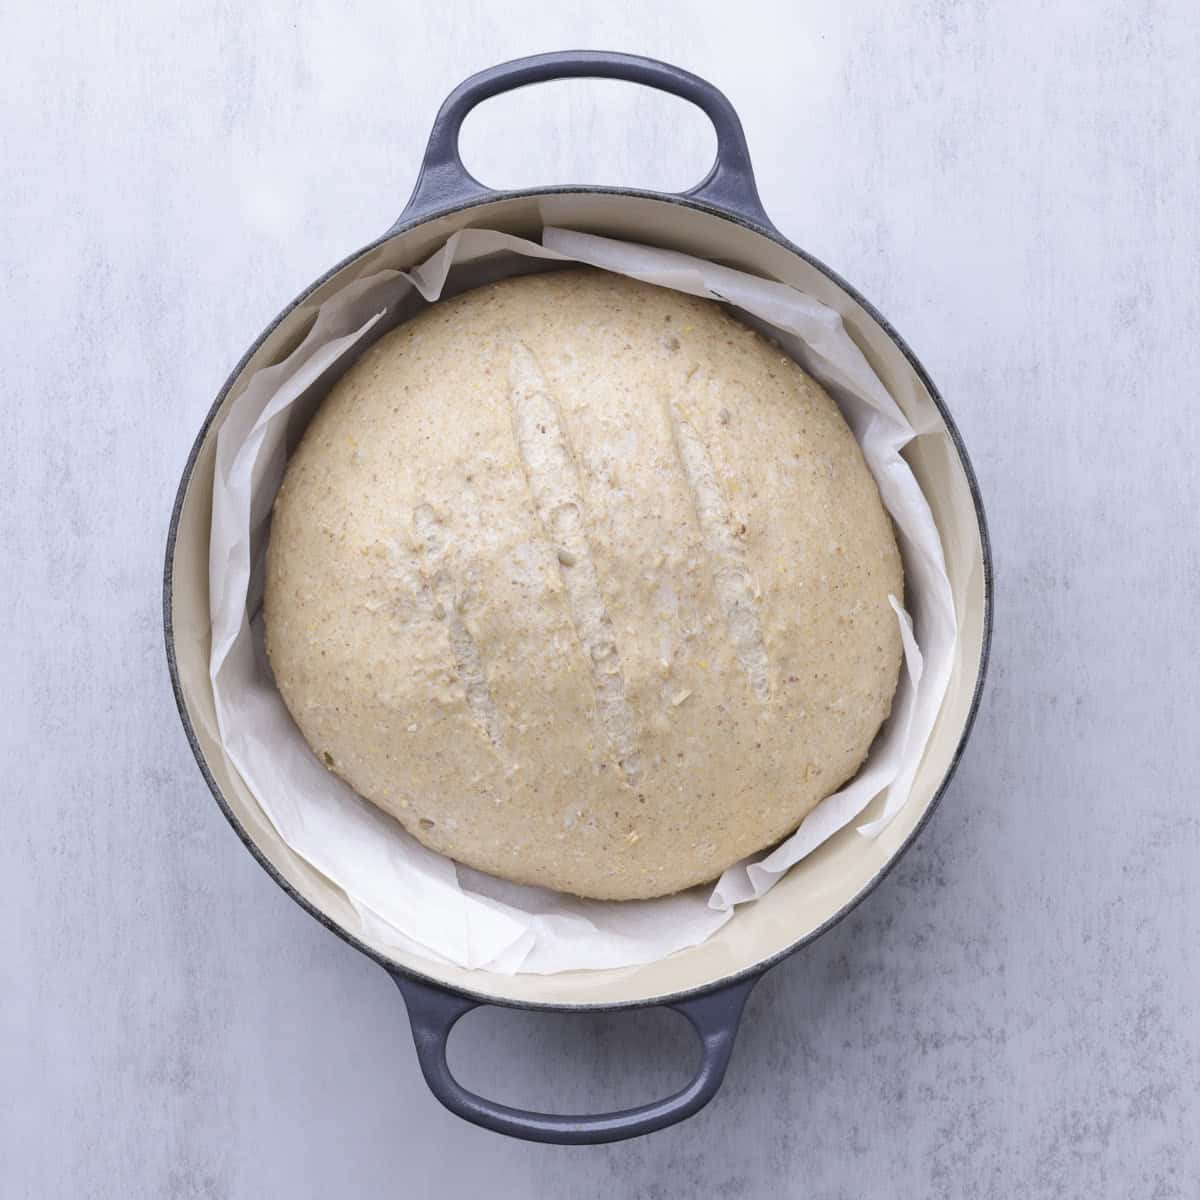
Step 6c: For an Artisan Loaf: Pre-heat your cast iron pot in the oven to 400°F. Remove it from the oven. Carefully lift the parchment paper with the risen dough and place it in the pot. Using a knife, make three slashes across the top. Cover with the lid.
Step 7: For a Sandwich Loaf: Bake at 350°F for 30 minutes or until a toothpick comes out clean. You can cover the top with tin foil for the last 10 minutes if the top is getting too dark.
For an Artisan Loaf: Bake at 400°F for 25 minutes and then remove the lid and bake for an additional 5-10 minutes or until golden, crisp and a toothpick comes out clean.

Step 8: Allow to fully cool. Slice thick or thin and enjoy with your favorite soup, for lunch as a sandwich or as a delightful snack with butter and honey!
Hint: Do not skip soaking the grain cereal in the milk and butter as it helps to soften the grains so they aren't tough and crunchy. It also creates soft texture, allows the cereal to blend well with the flours and rise evenly.
Substitutions
- Butter - substitute the butter for your favorite dairy-free "butter". If possible, use an unsalted variety.
- Milk - for a dairy-free alternative, use unsweetened soy or oat milk. Soy is ideal thanks to its higher protein and fat content, but any dairy-free milk will work.
- More Wheat - if you are averse to white flour you can use more or all whole wheat flour just know that it will not be as a tender of a loaf and substituting whole wheat for white is not 1 to 1 as the whole wheat absorbs more moisture. Try 1 to ¾.
Variations
- More Seeds Please! - try adding 2 tablespoons each of pumpkin seeds and poppy seeds for extra texture and nutrition.
- Topping - if you really want to impress you can add a seeded egg wash to the bread. To do so, mix 1 egg with 1 tablespoon of water and brush it over the loaf just before putting it in the oven. Sprinkle with a mixture of seeds, gently pressing them in to help them stick.
Need something the whips up a little quicker to go with your next meal? Try my Cheddar Cheese Chive Biscuit recipe that is a one bowl, no fuss bake!
Equipment
For Mixing: It is possible to mix this seeded bread recipe by hand and knead it to perfection but it's a lot of work. I recommend using a stand mixer of your choice. I have used both Bosch and Kitchen Aid and they both work well. I particularly like the dough hook that the Kitchen Aid mixers have.
For Baking: For a sandwich loaf using a simple tin bread pan allows the bread to heat and bake evenly without creating a thick crust. For an artisan loaf, I recommend using a cast iron dutch oven.
Storage
The first few days: Allow the Seeded Bread to fully cool before prepping it for any kind of storage. This seeded bread recipe can be left on the counter in an zip top bag for up to 4 days. After that I would recommend refrigerating it, or better yet, divide it on the day you bake it and freeze half right away.
Freezing: You can pre-slice the bread and freeze it in an airtight container or ziptop bag. To freeze a whole loaf, first wrap it in plastic wrap then place in an airtight container or zip-top bag. Consume within 2-3 months for best results.
Reheating: To thaw, simply leave the bread on the counter in the bag. You can open the bag a crack to help release some of the excess moisture but don't forget to close it up as soon as it is thawed. To quickly thaw individual pieces, simply pop them in the toaster for a minute or two.
Top Tip
It's always best to freeze your baking when it's fully cooled but still fresh - ideally the day it is baked. While it seems hard to put delicious smelling baked goods into the freezer it means they will be more delicate and fresh when they are thawed. If you won't finish the Seeded Bread within a few days, try slicing it in half and freezing part of it the day it's baked. That way, you can enjoy fresh bread later in the week without any extra effort.
FAQ
You can typically buy a small bag of gluten at your local supermarket in the baking section. You can also buy it online, such as from Amazon.
You can but you will still end up with less gluten in your flour than what my recipe calls for. It will still work, it just may not be quite as tender and soft.
Yes! It's just more labor intensive but you can still achieve a wonderfully tender loaf.
Related
Looking for other recipes like this? Try these:


Most Recent
Try these new Alaskan Skillet favorites!
Print


Seeded Bread Recipe
- Total Time: 3-4 hours
- Yield: 1 Loaf 1x
Description
Soft, tender, and packed with the nutty richness of flax-meal, sunflower, and sesame seeds, this Seeded Bread is everything a sandwich bread should be. What sets it apart? It stays remarkably soft - just like the day it was baked - even days later. Wholesome, flavorful, and freezer-friendly, it's the kind of loaf you'll reach for again and again.
Ingredients
1 cup (240 grams) milk preferably 1% or higher
3 tablespoons (1.5 ounces) unsalted butter melted
½ cup (90 grams) 8 grain* cereal mix
½ cup (115 grams) water lukewarm
2 tablespoons (45 grams) honey
2 ¼ teaspoons (8 grams or one packet) yeast
2 cups (300 grams) all purpose flour
¾ cup (100 grams) whole wheat flour
2 tablespoons (22 grams) vital wheat gluten*
2 tablespoons (20 grams) flaxseed meal
2 tablespoons (20 grams) sunflower seeds
1 tablespoon (10 grams) sesame seeds
2 teaspoons (15 grams) salt
Instructions
1. Warm milk to slightly above lukewarm and add the melted butter. Pour in the 7 grain cereal, stir to combine and allow to soak for 10 minutes.
2. Warm the water until lukewarm, stir in the honey to dissolve, then add the yeast and stir. Let sit in a warm place until bubbly and active, about 10 minutes.
3. In your stand mixer combine the remaining ingredients. Then pour in the milk and cereal mixture as well as the active yeast mixture.
4. Using a dough hook, turn your mixer on low allowing the ingredients to combine, stopping as needed to scrape down the sides and increasing the speed to medium when ready. Mix for 10 minutes.
5. The dough should be dense and only slightly sticky. Add more flour, 1 tablespoon at a time if needed. Remove from the mixer onto a clean work surface. Feel free to knead it a few times to form it into a tight ball. Place in a lightly oiled bowl covered with a lid or plastic wrap. Allow to rise in a warm place until doubled in size, about 2 hours.
6a. For a Sandwich Loaf: Remove the dough from the bowl onto a clean surface. Pulling the dough towards you along the work surface, make a tight log, tucking in the ends as needed. Place in an greased loaf pan and cover with plastic wrap. Put the pan in a warm place and allow the loaf to rise until slightly above the rim of the pan.
6b. For an Artisan Loaf: Remove the dough from the bowl onto a clean surface. Pulling the dough towards you along the work surface, make a tight ball, rotating the ball as needed. Place in medium sized bowl lined with parchment paper. Put in a warm place and allow the loaf to rise until doubled again.
6c. For an Artisan Loaf: Pre-heat your cast iron pot in the oven to 400°F. Remove it from the oven. Carefully lift the parchment paper with the risen dough and place it in the pot. Using a knife, make three slashes across the top. Cover with the lid.
7a. For a Sandwich Loaf: Bake at 350°F for 30 minutes or until a toothpick comes out clean. You can cover the top with tin foil for the last 10 minutes if the top is getting too dark.
7b. For an Artisan Loaf: Bake at 400°F for 25 minutes and then remove the lid and bake for an additional 5-10 minutes or until golden, crisp and a toothpick comes out clean.
8. Allow to fully cool. Slice thick or thin and enjoy with your favorite soup, for lunch as a sandwich or as a delightful snack with butter and honey!
*All nutritional information is an estimation only. Exact nutritional value depends on exact amounts and ingredients used.
Notes
You can use any variety of grain cereal - 7, 8, 10, 12 - they all work wonderfully.
You can put in less gluten if you wish, your bread just won't be quite as soft and tender. Alternatively, you can use bread flour instead of all purpose flour and omit the additional gluten as well, but again, the texture will vary slightly.
5 & 6 - Rise times will vary greatly depending on the warmth of your house. It's best to watch the dough rather than the clock. Watch for it to have doubled in size on the first rise and for it to be about ½-1" above the pan on the second rise.
- Prep Time: 40 minutes
- Cook Time: 30 minutes
- Category: Bread
- Method: Bake
- Cuisine: American
Jenice Wallace says
This is my all time favorite bread recipe. My goal was to get it to be tender and soft like store bought bread, without all the additives. I think I achieved it! I hope you love it as much as I do!